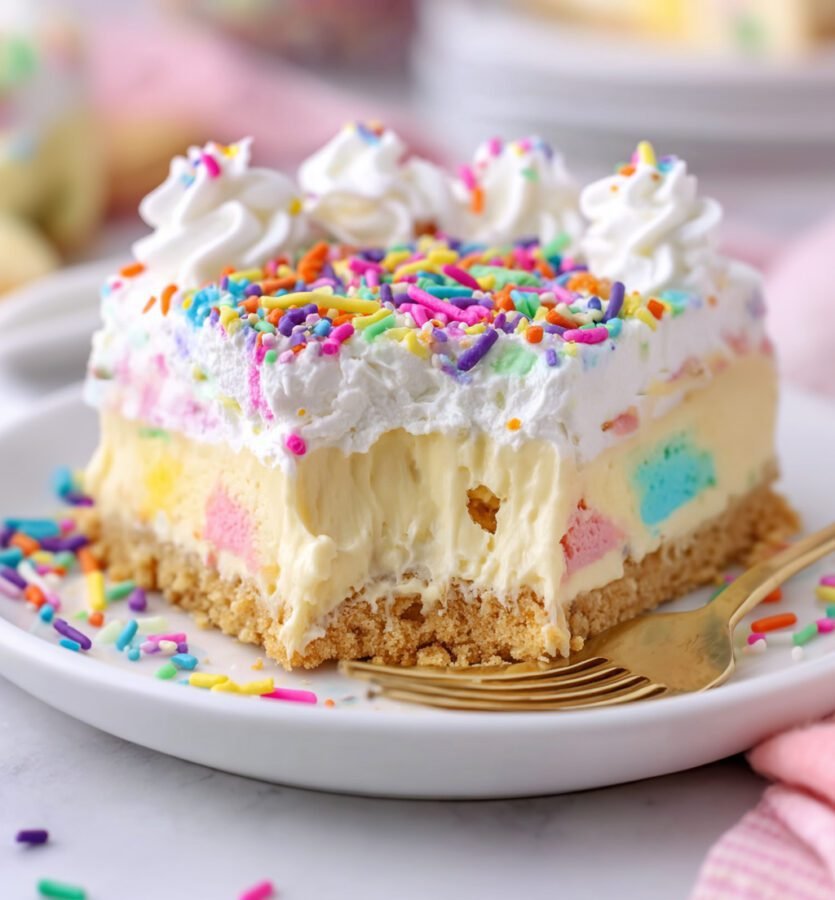
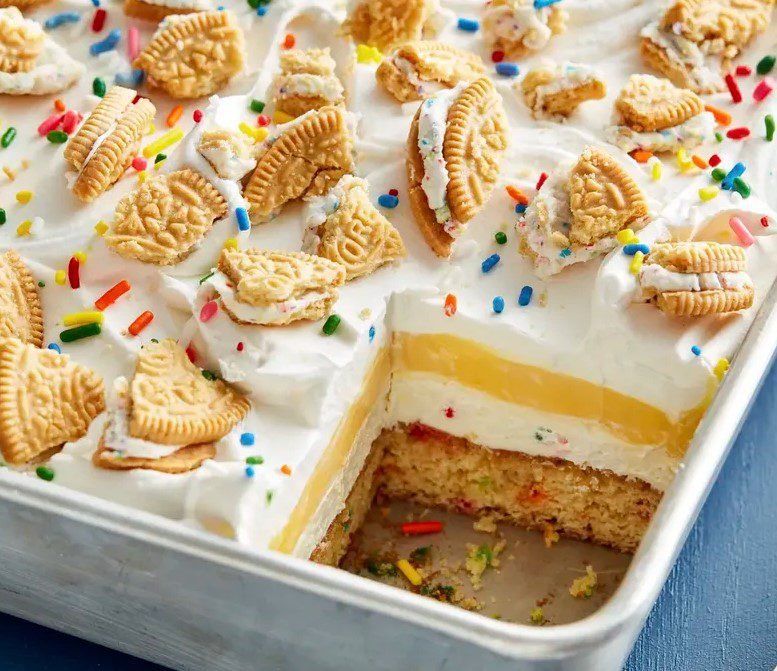
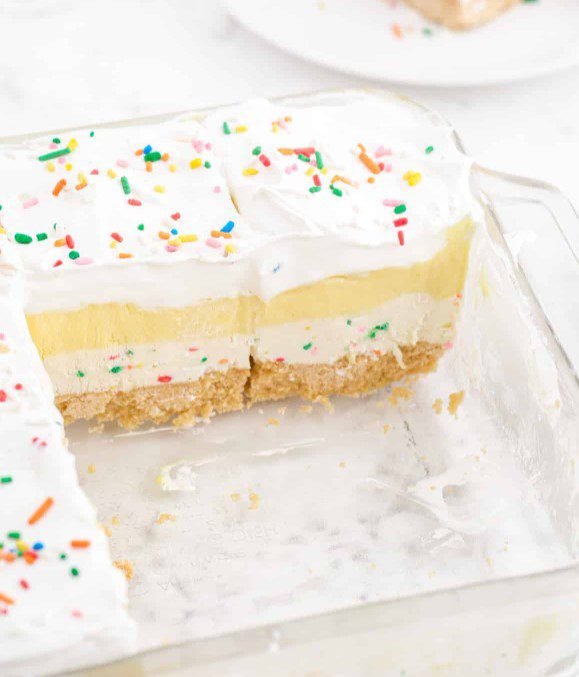
There’s something about the words “cake batter” that instantly makes me smile — and I know I’m not alone. Whether it’s the nostalgic smell, that creamy sweetness, or the confetti-colored sprinkles, this Cake Batter Lush Dessert brings pure joy with every bite. Thank you so much for stopping by — I’m truly grateful you’re here, and I cannot wait to share this fun and festive recipe with you!
What Is Cake Batter Lush Dessert?
Think of this as your favorite childhood birthday cake reimagined as a cool, creamy, no-bake dessert. Lush desserts — sometimes called dessert lasagnas — are made with layered components like cookie crusts, creamy fillings, puddings, and whipped toppings. This version gets a sprinkle-filled cake batter twist, making it colorful, celebratory, and just downright delightful.
Why You’ll Love This Cake Batter Lush Dessert
- No baking required – perfect for hot days or when you don’t want to heat up the kitchen.
- Incredibly easy – every layer is simple, and it comes together with pantry staples.
- Festive and fun – with rainbow sprinkles and a cake mix boost, it’s like a birthday in every bite!
- Make-ahead friendly – perfect for parties, potlucks, or just because.
What Does It Taste Like?
This dessert is smooth, creamy, and light — like cheesecake meets birthday cake meets pudding pie. The crust gives a buttery, slightly crunchy contrast that grounds the creamy layers. And thanks to that hit of dry cake mix in the pudding, every spoonful carries that unmistakable cake batter flavor — sweet, a little vanilla-y, and totally irresistible.
Benefits of This Recipe
- Kid-friendly: This dessert is always a hit with little ones (and the sprinkles don’t hurt).
- Customizable: You can switch up cookie types, pudding flavors, or sprinkle colors.
- Crowd-pleaser: It feeds a group and is easy to slice and serve.
- Gluten-friendly options: Just sub in gluten-free cookies and cake mix.

Ingredients for Cake Batter Lush Dessert
For the Crust:
- 1½ cups crushed Golden Oreos or vanilla wafers
- ¼ cup melted butter
For the Cheesecake Layer:
- 8 oz cream cheese, softened
- 1 cup powdered sugar
- 1 tsp vanilla extract
- 1 cup Cool Whip (or any whipped topping)
For the Pudding Layer:
- 1 box (3.4 oz) instant vanilla pudding
- 1½ cups cold milk
- ½ cup dry cake mix (white or yellow)
For the Topping:
- 1½ to 2 cups Cool Whip
- Rainbow sprinkles (the more, the merrier!)
- Optional: extra crushed cookies for garnish
Tools You’ll Need
- 9×9-inch baking dish
- Mixing bowls (at least two medium-to-large)
- Electric mixer or whisk
- Rubber spatula
- Measuring cups and spoons
- Food processor (optional, for crushing cookies)
Add-Ins & Ingredient Swaps

I promised you versatile, and here’s proof!
- Cookies: Try graham crackers, chocolate sandwich cookies, or shortbread instead of Golden Oreos.
- Cake Mix: Funfetti mix adds even more color; chocolate cake mix brings a twist!
- Pudding: Use cheesecake or white chocolate pudding for a flavor variation.
- Toppings: Swap sprinkles for mini chocolate chips, crushed candy bars, or fresh berries.
How to Make Cake Batter Lush Dessert
1. Make the Crust:
Mix crushed cookies with melted butter in a bowl. Stir until the mixture resembles wet sand. Press it firmly into the bottom of your baking dish and pop it in the freezer to chill while you work on the next layer.
2. Make the Cheesecake Layer:
Beat softened cream cheese with powdered sugar and vanilla until smooth. Fold in the Cool Whip until light and fluffy. Spread this dreamy layer over the chilled crust.
3. Make the Pudding Layer:
Whisk together the pudding mix, cold milk, and dry cake mix until smooth and thick — it should take about 2 minutes. Pour and smooth this over the cheesecake layer.
4. Add the Whipped Topping:
Spread the remaining Cool Whip over the top. Get those swirls going! Then go wild with sprinkles (you know you want to).
5. Chill and Serve:
Let the dessert set in the fridge for at least 4 hours — overnight is even better! This helps the layers firm up beautifully. Slice into squares and serve chilled!
What to Serve With This Dessert

This lush stands strong on its own, but if you’re planning a full spread:
- Fresh fruit platters for a light contrast
- Coffee or iced lattes (the creaminess pairs perfectly)
- Kid-friendly drinks like strawberry milk or punch for birthday party vibes
Tips for Perfect Cake Batter Lush
- Soften the cream cheese fully to avoid lumps.
- Use cold milk for the pudding layer — warm milk won’t thicken it properly.
- Chill each layer if needed before adding the next, especially if your kitchen is warm.
- Don’t skip the chill time! It’s key for those clean, gorgeous layers.
- Want neat slices? Run a sharp knife under hot water and wipe between cuts.
How to Store Cake Batter Lush
- Refrigerator: Store covered in the fridge for up to 5 days.
- Freezer: You can freeze it for 1–2 months, but the texture will soften once thawed — still delicious, just less defined layers.
- Make-ahead: Perfectly preppable the day before serving!
Frequently Asked Questions
Can I use homemade whipped cream instead of Cool Whip?
Yes! Just whip 2 cups of heavy cream with 2–3 tbsp powdered sugar until stiff peaks form.
Is it safe to eat raw cake mix?
For peace of mind, you can heat-treat the dry cake mix by microwaving it for 1 minute (in 15-second intervals) or baking it at 350°F for 5 minutes to kill any potential bacteria.
Can I double this recipe?
Absolutely — just use a 9×13-inch dish and double each ingredient!
Can I make this gluten-free?
Yes! Use gluten-free cookies and cake mix, and double-check your pudding is GF-certified.
In Conclusion: Sweet, Simple, and Celebration-Ready

This Cake Batter Lush Dessert is one of those recipes that makes everyone smile — whether you’re serving it for a birthday, a cookout, or just a “because it’s Tuesday” treat. It’s creamy, colorful, and crazy-easy to make. You don’t need an oven, and you don’t need to fuss. Just mix, layer, chill, and enjoy.
Loved this one? Be sure to check out my other peachy favorites like:
- Peach Cobbler Dump Cake
- No-Bake Peach Cheesecake Bars
- Peach & Cream Poke Cake
Let’s Stay Connected!
If you try this Cake Batter Lush Dessert, please leave a review below and tag your beautiful creations on Pinterest! I love seeing how you bring these recipes to life — and trust me, this one’s a showstopper 💕
Nutritional Info (Approx. per serving)
Serving size: 1 square (1/9 of 9×9 dish)
Calories: ~310
Fat: 18g
Carbs: 34g
Sugars: 22g
Protein: 3g

Cake Batter Lush Dessert: A No-Bake Treat That Tastes Like a Birthday Party!
Description
A colorful, creamy, no-bake dessert that tastes just like birthday cake! This Cake Batter Lush Dessert features a buttery cookie crust, fluffy no-bake cheesecake, vanilla pudding spiked with cake mix, and a cloud of whipped topping. Layered, chilled, and topped with rainbow sprinkles — it’s festive, easy, and always a hit at parties. Make it ahead, slice it cold, and get ready for smiles!
Ingredients
For the Crust:
1½ cups crushed Golden Oreos or vanilla wafers
¼ cup melted butter
For the Cheesecake Layer:
8 oz cream cheese, softened
1 cup powdered sugar
1 tsp vanilla extract
1 cup Cool Whip (or any whipped topping)
For the Pudding Layer:
1 box (3.4 oz) instant vanilla pudding
1½ cups cold milk
½ cup dry cake mix (white or yellow)
For the Topping:
1½ to 2 cups Cool Whip
Rainbow sprinkles, for topping
Optional: extra crushed cookies for garnish
Instructions
-
Prepare the Crust:
In a bowl, mix crushed cookies with melted butter until evenly combined. Press firmly into the bottom of a 9×9-inch baking dish. Freeze while preparing the next layer. -
Make the Cheesecake Layer:
Beat softened cream cheese, powdered sugar, and vanilla until smooth and creamy. Fold in 1 cup of Cool Whip. Spread this mixture over the chilled crust. -
Whisk the Pudding Layer:
In another bowl, whisk together the instant pudding mix, cold milk, and dry cake mix until smooth and thickened (about 2 minutes). Gently spread over the cheesecake layer. -
Add the Topping:
Spread remaining Cool Whip on top. Finish with a generous sprinkle of rainbow sprinkles and (if using) crushed cookies. -
Chill and Serve:
Refrigerate the dessert for at least 4 hours, or overnight, until fully set. Slice, serve chilled, and enjoy every bite!
Notes
Use cold milk when mixing the pudding layer to ensure it thickens properly.
For extra fun, try using Funfetti cake mix or colorful sprinkles to match a party theme.
You can heat-treat the dry cake mix before using by microwaving it for 1 minute or baking at 350°F for 5 minutes — just to be safe!
Want neat slices? Run your knife under hot water and wipe clean between each cut.
This dessert can be made a day ahead and stored in the fridge — it actually slices better after chilling overnight.
Double the recipe for a 9×13 pan and feed a crowd!


Pink Lemonade Fluff Salad
Bite Me Baby Shark Cupcakes (Perfect for Shark Week & Beach Parties!)
Garlic Butter Bacon Cheeseburger Rollups
Pink Mojito Ice Cream (No-Churn)
Bahama Mama Cupcakes: Tropical Pineapple-Coconut Cupcakes with Cherry-Rum Buttercream
Bahama Mama Ice Cream: A Tropical No-Churn Dream